Installing Roon extension on DietPi
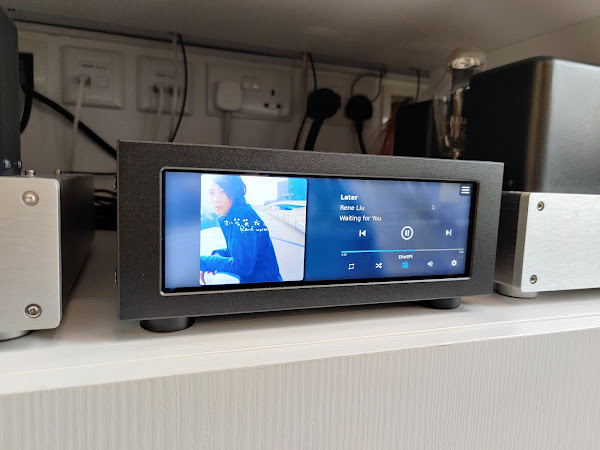
Fortunately there is a plugin called "roon-web-controller" which bridges Raspberry Pi and Roon. Below is the photo of how it looks
This method works with any HDMI screens of different resolutons.
A YouTube demo is also available here Raspberry Pi STEALTH works with Roon now!
This tutorial will walk you through the steps setting up a Roon bridge on DietPi. Credits to Mike Plugge https://github.com/pluggemi/roon-web-controller
1. Install DietPi
Download the image and flash it on the micro SD card, balenaEtcher is recommended.
2. Modify config.txt
Depending on the widescreen touchscreen you use, append the following to config.txt under root of the SD card:
hdmi_group=2
hdmi_mode=87
hdmi_timings=400 0 100 10 140 1280 10 20 20 2 0 0 0 60 0 43000000 3
hdmi_blanking=1
max_usb_current=1
display_rotate=3 #1:90;2: 180; 3: 270
3. Set up the home page of Chromium
Again depending on the widescreen touchscreen you use, change the Chromium resolution in diet.txt under root
SOFTWARE_CHROMIUM_RES_X=1280
SOFTWARE_CHROMIUM_RES_Y=400
SOFTWARE_CHROMIUM_AUTOSTART_URL=http://localhost:8080
4. Boot up DietPi
Wait for a few minutes...
5. SSH to DietPi
User: root
Password: dietpi
6. Install Roon Bridge and Chromium-browser in dietpi-launcher
Follow the instructions in dietpi-launcher
This would take a few minutes depending on network speed...
7. Set Chromium-browser as auto boot in dietpi-launcher
Follow the instructions in dietpi-launcher
8. Set chromium-browser to be more smooth
sudo nano /etc/chromium.d/dietpi
export CHROMIUM_FLAGS="$CHROMIUM_FLAGS --no-sandbox --use-gl=egl --enable-gpu-rasterization"
9. Install Asian fonts (OPTIONAL)
sudo apt-get install fonts-wqy-zenhei
10. Uncomment dtoverlay=vc4-kms-v3d in /boot/config.txt
sudo nano /boot/config.txt
11. Install git and npm
apt-get update
apt-get install git
apt-get install npm
12. Grab the extention
git clone https://github.com/pluggemi/roon-web-controller.git
cd roon-web-controller
npm install
type “npm audit fix” twice to address the issues
node app.js
13. Set auto start of Roon Web Controller
echo '/usr/bin/node /root/roon-web-controller/app.js &' > /etc/chromium.d/node
14. Install unclutter-xfixes to hide mouse cursor (OPTIONAL)
apt-get install unclutter-xfixes
echo '/usr/bin/unclutter-xfixes -display :0 -idle 1 &' > /etc/chromium.d/dietpi-unclutter-xfixes
15. Reboot once to take effect
sudo reboot
16. Enable the extention in Roon
Settings > Extentions
17. You can edit the Roon bridge information


Comments
Post a Comment