DIY Raspberry Pi 4 piCorePlayer Part I - Mechanical Design & Assembly
Introduction
I have been playing with some kinds of DACs for several years and was satified with the performance until I came across the raspberry Pi 4. The sound produced by rasberry Pi is so musical and dynamic, and you can choose from different DAC HAT that you desire. After trying different headless operation systems, I decided to go for piCorePlayer which has Logitech Media Server (LMS) and SqueezePlayer built in.
This tutorial will walk you through how to build a streamer / DAC player with linear power supply and a touch screen (Jivelite).
Mechanical DesignIt is easy to design the layout of components in 2D, but quite difficult if you need to design a mechanical anchorage for a 5" touch display in 3D - stylish is of utmost importance, but strong and reliable anchorage also play an important role.
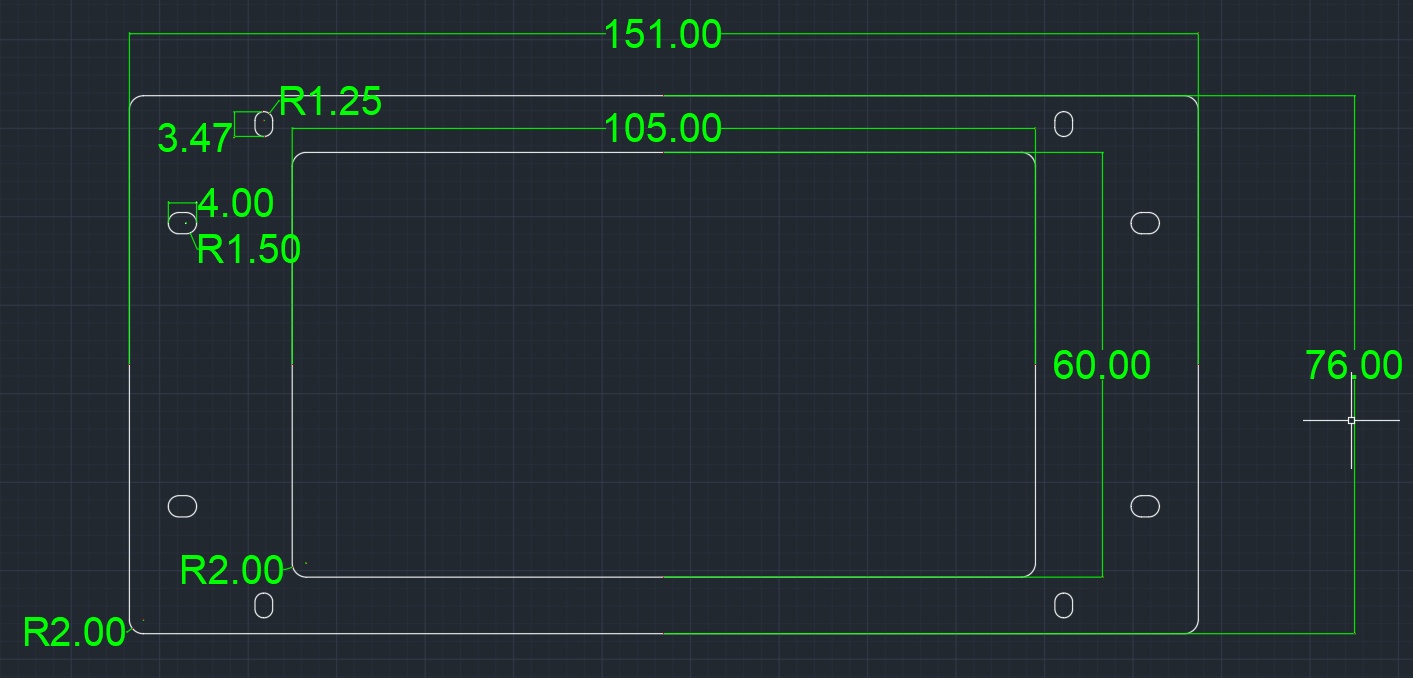
FaceplateThe dimensions of the case that will be used in this player are 215*100*228 mm. The faceplate thickness is 8mm, in order to "make" it stylish, I decided to cover the touch screen with the faceplate. The thinnest part is only 1mm which cannot be fabricated manually, the only way is CNC. As I do not posses any CNC tools, the case was fabricated by a factory in mainland China. The 3D drawing looks like this below:

Blow shows the CNC fabricated faceplate:

The internal side of the faceplate. Dust-proof seals are installed. They serve two purposes: 1. prevents mechanical wear, and 2. electrically isolate the touch screen from the case (which is grounded), otherwise the touch screen may not work.

The next step is to install the RPi/display/DAC HAT onto the faceplate. The first player that I made used a 3mm epoxy board (not sure if this is the correct term) for anchorage, but it was quite costly - RMB70+/pcs (~USD10). Later I realized a 2mm single-sided FR4 PCB is strong enough to hold the module. Note that the connections on the PCB have no functions, they are intended for decorations only.
Below shows the drawing of the touch display. The dimensions have to be well calculated, otherwise it will not fit.
Fabriated single-sided PCB as touch screen anchorage (2mm thick):

5" touch screen from WaveShare:

ES9038 Q2M DAC HAT:

Combine them together:

View from front:

Now it is time to install them onto the faceplate:

View from front:

Now let us put the display panel aside and start working on other parts. We will work on the back panel first. This part is easy, just prepare the 2D drawing, fabricate and install the ports, sockets and connectors.


I have spent some time looking around for the USB and LAN D-sub port, finally I decided to go for Neutrik owing to the high quality and reasonable price.

The power socket comes from Taiwan JEC, like Neutrik, it has high quality but reasonable price. After assembling the power socket, USB, LAN and RCA sockets, the back panel is now completed.

The main body is even simpler, nothing complicated except you will need a little technique to solider the LM317 and PNP BJT onto the LPS module. I will talk more about the power supply in Part II.
Just like the back panel, you will need to decide the locations for the power supply and LPS module first, just to make sure there is enough space for them and not conflicting with other components.


The power supply used is the R-type transformer, dedicated for audio use. It delivers 8V/5A which is more than enough for Raspberry Pi 4, touch screen and the DAC HAT.

The LPS module was designed for this application. Note that power input and output are on the same side. This can shorten the path and reduce power loss and interference. We will talk more about that later in Part II. The below photo shows that both the power supply and the LPS module are installed, the LM317 and PNP BJT are soldered lastly. Note that electrical isolation is required.

The RCA cable is meant to be plug-and-play. If there is a problem needs to be fixed, each component can be disembled without any hassle.

After some effort, the player is finally assembled. Do not connect the power to the Raspberry Pi before the voltage is adjusted to 5V.

Please leave me a comment if there is anything that I can help. Enjoy DIY!


面板做得好靓,多谢大佬的教程,我也去做一套。
ReplyDelete謝謝欣賞
ReplyDeleteHi, do you sell these? I've been looking at building something like this but find it very difficult to get the right case and build a lps. I would have no problem assembling everything including pi, hat, screen. Please let me know if you can help me with the case and lps. I'm based in the UK. Thanks
ReplyDeleteHi, thanks for your interest. I have built a new version which is more compact and clean. But I haven't had a chance to update the progress here. Please visit my Facebook page (1st post) for more details:
Deletehttps://www.facebook.com/SMHPHK/
To answer your question, yes, I will be re-packaging the whole thing into a kit set and sell it online after Chinese New Year. Please PM me or leave your email address so that I can keep you updated for any new progress. Please note Paypal charge and shipping cost will incur.
Only black version (silver front panel, others black) will be available.
Delete