Posts

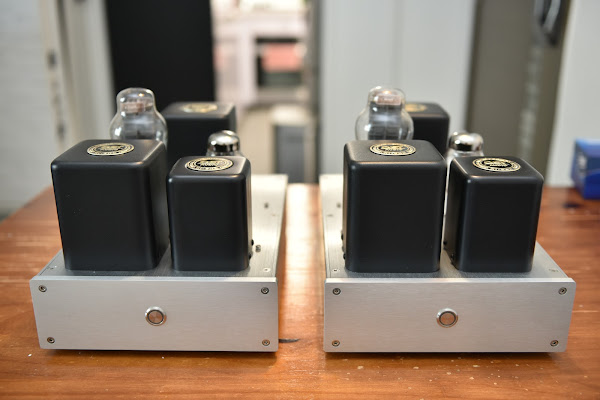
DIY 300B Monoblock

Image
I have been working on several EL84 tube amps - stereo, dual mono and mono. All of them sound great, but the problem is that each channel can only output 1.4W max, which is good enough for close listening in a small space. As for the next project, I decided to build a pair of monoblocks which can output larger power. Why monoblocks? Because monoblocks can deliver the clearest sounds without affecting the other channel (crosstalk). And it's relatively easier to build a pair of monoblock VS a dual mono. So now it comes to the selection of tubes. I like listening to vocals, people are saying both 2A3 and 300B are very suitable for vocal and both tubes are quite similar. However 300B can deliver larger power, so I decided to go for 300B. Design Rationale I like simple and clean things, and cannot withstand wires flying from one end to another like a spider web, ...

How to turn your piCoreplayer into a CD Player

Image
piCoreplayer can be very handy when playing music stored in the NAS or HDD, but what if you want to play a CD one day? Would you invest another CD player if you just want to play a CD occationally? This article will walk you through the steps how to make a cheap but nice CD player with your existing devices. Materials -a piCoreplayer -an external USB CDROM -patience Step 1 - Connect USB CDROM to piCoreplayer Connect the external USB CDROM to the USB port of your piCoreplayer first, either the 2.0 or 3.0 port will do. If you do not have one, you can buy one from computer centers, it costs around USD30. Step 2 - Install extension in piCoreplayer By default, piCoreplay does not suppor...

DIY Raspberry Pi 4 piCorePlayer Part III - Software

Image
Software Finally it comes to the software session after a complete assembly. After trying several headless software, namely Volumio, Moode Audio, Hifiberry OS and Picoreplayer, I decided to go to Picoreplayer. This is not only because of the outstanding sound quality, but also a very user-friend interface (touchscreen) and numerous plugins available. Boot up sequence - Personally I like it quite much, it looks pretty cool on a 5" touchscreen :P Setting up Picoreplayer This guideline will walk you through the settings of Picoreplayer. The set up was based on Picoreplayer 7.0.0 but it would be pretty much the same for the latest version 8.0.0. I am not going to teach you how to flash the image to the SD card as there are lots of tutorials available. You may download the latest version 8.0.0 from Picoreplayer website: https://docs.p...

DIY Raspberry Pi 4 piCorePlayer Part II - Power Supply

Image
Power Supply Here comes to the power supply of the RPi, DAC HAT and the touch screen. It is recommended to supply 5V/3A to the RPi 4 and touch screen, together with DAC HAT and some buffer, 5V/5A would be a suitable option for the system. In this project I am using a 40VA R-type audio grade transformer with 8V/5A output capability. 8V is the RMS value without loading. The peak voltage is 8*1.41=11.28V, the low dropout IC requires >1.5V voltage differential, also considering 1.4V drop after the bridge rectifier, 8V output would be a suitable option (provided that decoupling capacitance is large enough). The power supply circuit is rather simple, LM317 sets the desired voltage, a PNP BJT serves as a switch to provide large current. Schematic and Layout Below shows the layout of the power supply circuit. The input and output are placed on the sa...